
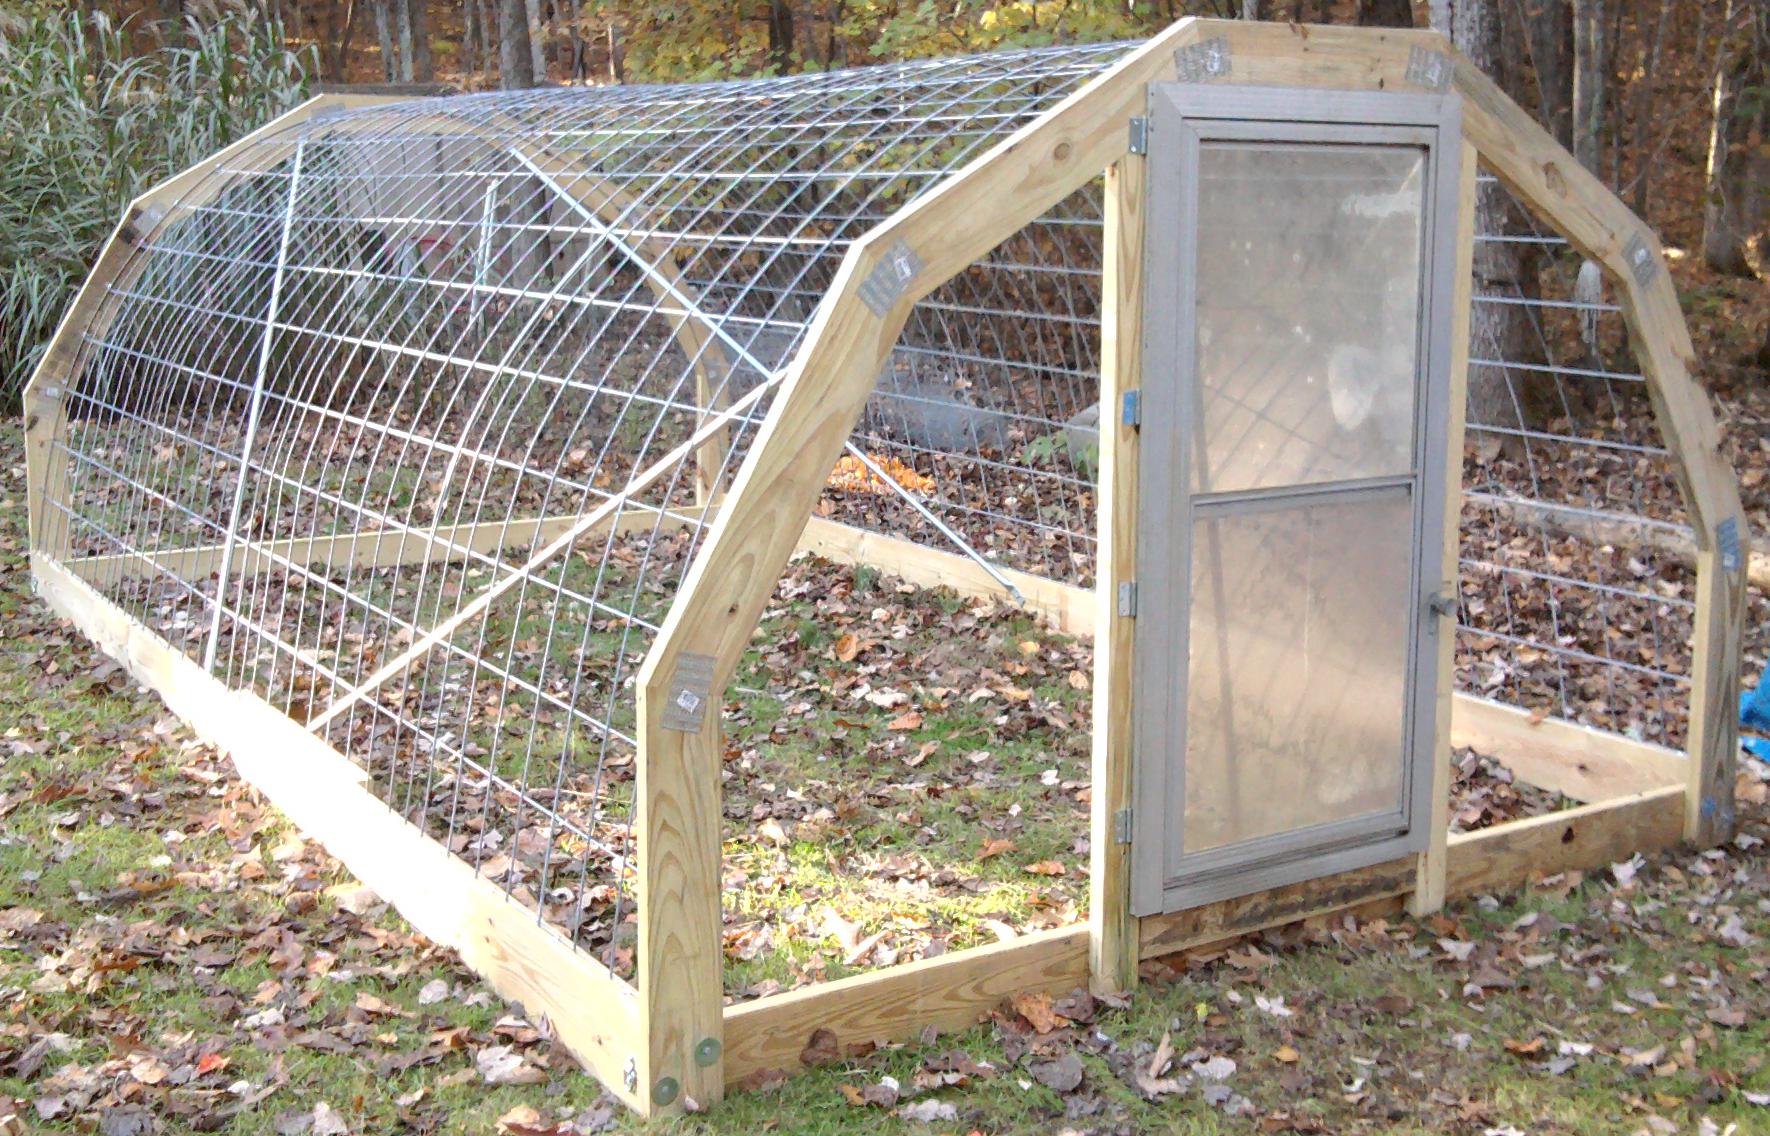
Here are some plans for a simple greenhouse you can build in a weekend. The frame of the greenhouse is made from treated lumber, and the canopy is composed of livestock panels, as shown in the picture to the right (click on the picture to zoom). The intent of this greenhouse is container or elevated bed gardening, not in-ground planting.
Lots of greenhouses are made from curved PVC pipe or plastic conduit, but that plastic can interact with the covering plastic to degrade it over time, especially in the sunlight. This greenhouse uses metal wire livestock panels which are available at any farm store. These panels are 16 feet by 50 inches, and cost $20 each. There are four used in this greenhouse, making it 16.7 feet in length, and about 9.5 feet wide. The livestock panels are easy for one person to bend into a semicircle, and they may be curved to fit into the bed of a pickup truck or trailer for transport. The panels also provide near continuous support for the plastic covering, and provide a good snow load support.
Use of treated lumber in a greenhouse is possible today because arsenic was removed from the preservation formula in 2003. Treated lumber still contains copper and other compounds for preservation, but this greenhouse will be used only for container gardening, and no plants will be located in the ground near the treated lumber.
The sides of the greenhouse are 2×8’s. Two were spliced together on each side and cut to a 201 inch total length, which fits the four livestock panels perfectly.
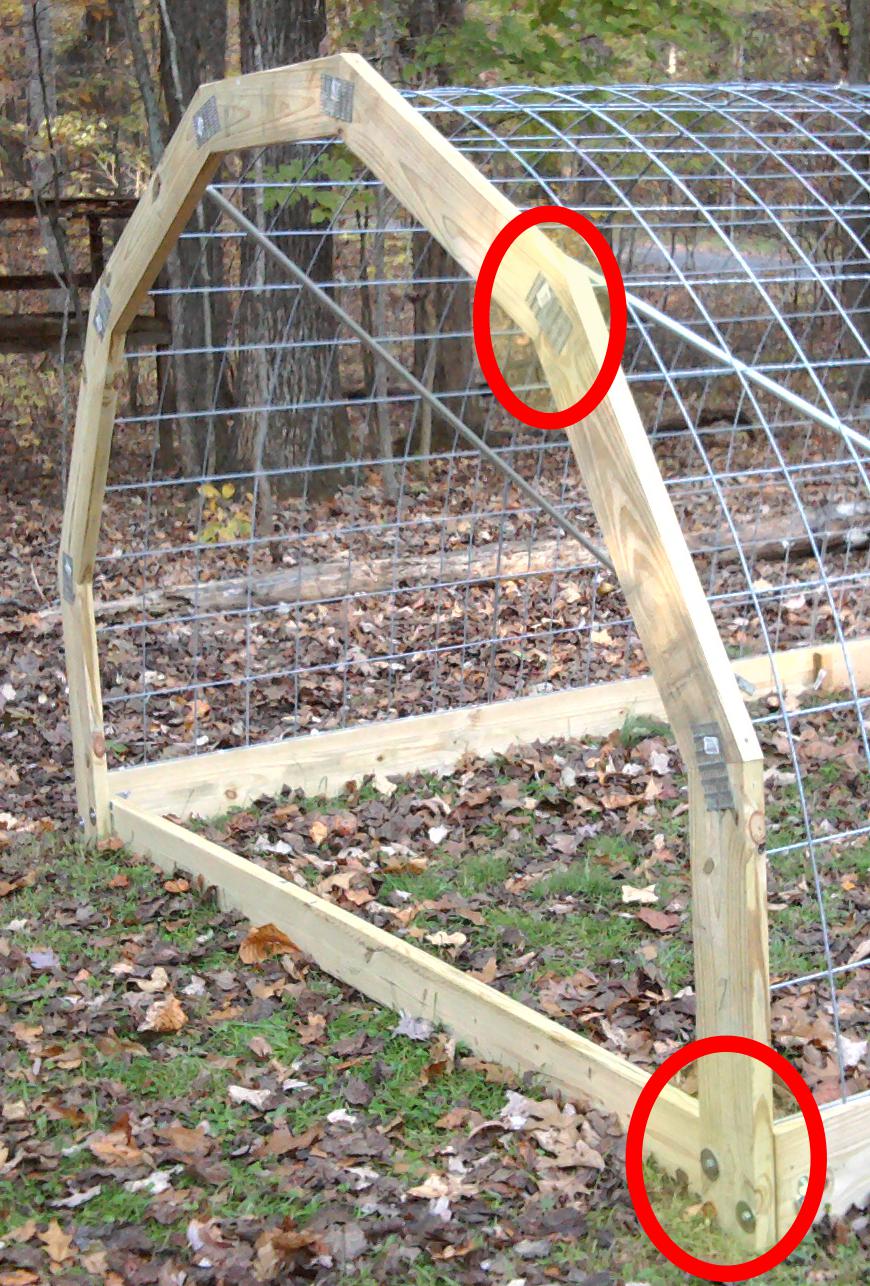
The end frames of the greenhouse are made from 2×6 lumber, as shown in the picture. This diagram shows the lengths of each section. Number the sections after cutting so you don’t put them together out of order. The cutting angle is 15 degrees. Mending plates are used to attach the sections, but 3″ deck screws are also run through the junctions for extra strength. The completed arch is sturdy. Each leg of the arch is bolted into the 2×8 side beams with two galvanized 3″ lag bolts with fender washers.
Inside the corners of the frame (not shown) are corner plates which are screwed into the sides and cross pieces, for added strength.
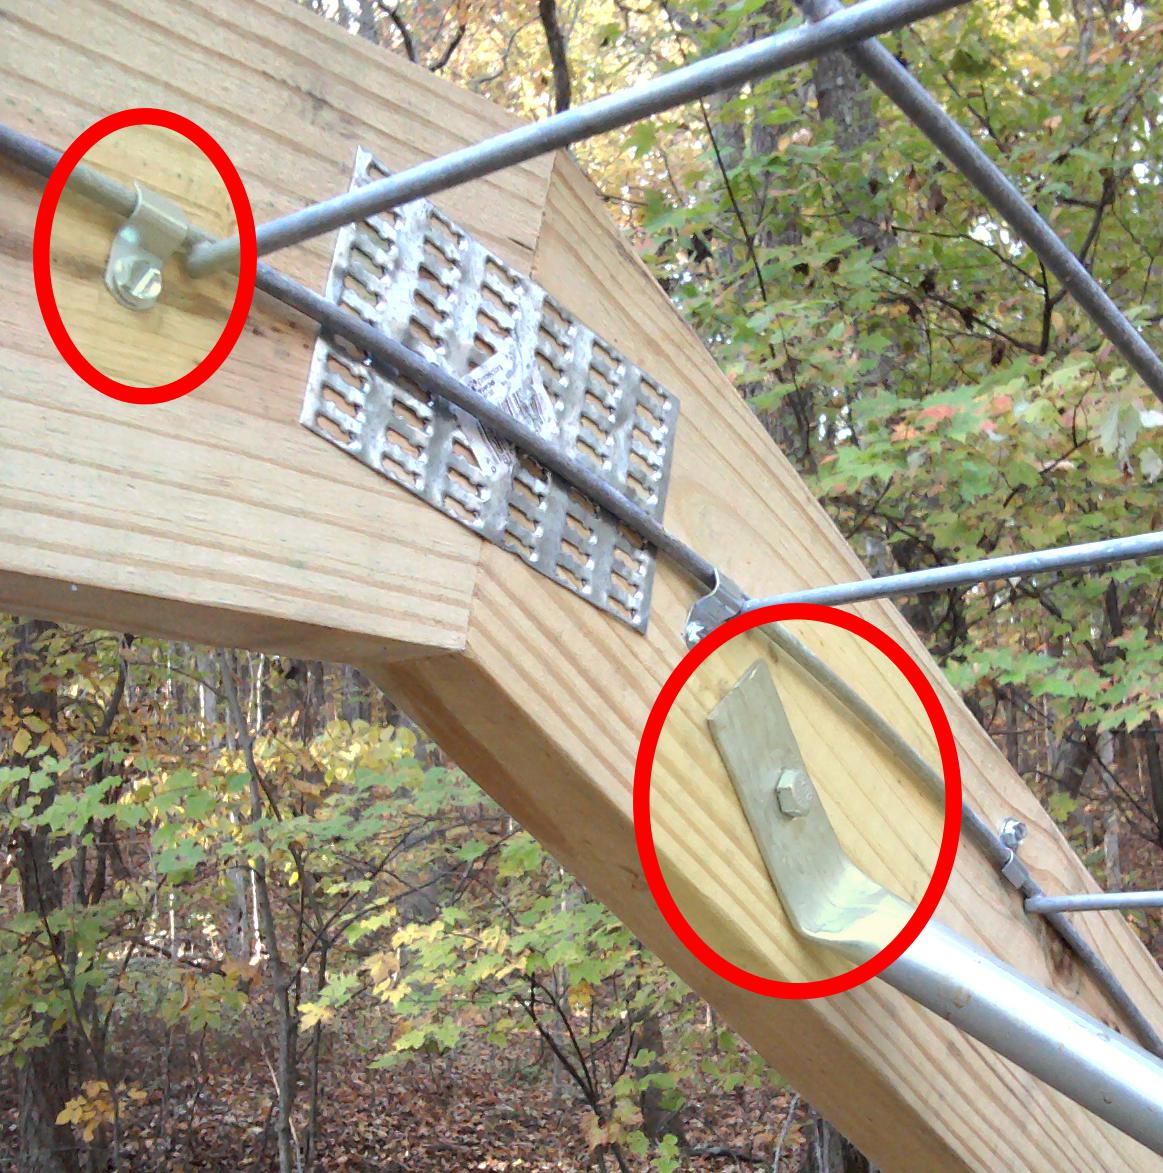
The next photo shows the attachment of the livestock panels. This is accomplished using brackets availalble in packets of 50 in the electrical aisle of any local hardware store. Each bracket is secured with a 3/4″ long #12 sheet metal screw. The brackets are alternated on each side of the livestock panel wire to add stability. The same brackets are used along the straight sides to secure the panels.
Also shown here is the attachment of one of the four stabilizing bars, which is a 3/4″ x 8ft electrical conduit. The end is hammered out flat with a hole drilled in the flat section, bent appropriately and secured to the frame with a one inch galvanized lag bolt.
Where the livestock panels come together, steel wire is wrapped around the joints to make a unified structure. Picture frame wire could be used, but it should be a smooth wire to avoid puncturing or damaging the plastic covering.

This picture shows the attachment of the stabilizing bars to a side of the greenhouse, using the same attachment method. These four bars give the greenhouse sides added support under snow load, as snow tends to make the ends buckle in. These bars, plus the livestock panels make for a solid structure. Also visible are the clips securing the livestock panels to the side frame member.
The picture of the completed greenhouse, above, shows a screen door framed in. This door was purchased for $25 at a Habitat for Humanity ReStore, which is a great source for inexpensive project materials. The door is a 1970’s vintage aluminum door, has no plastic, and was easy to shorten by cutting off the blank panel at the bottom with a hack saw. The door even has two sliding glass panes for greenhouse ventilation.
All that’s left is to cover the greenhouse in plastic. Four mil thick plastic was chosen for this, and is available in translucent white at a local hardware store. Thicker plastic is available, but for about $75 you can get enough plastic to last several years.
The plastic is simply spread over the wire frame, and anchored with dirt on the ground, or 2×4’s. Loop anchors are mounted on the corners of the greenhouse for tying rope or straps over the top, to secure the plastic in the wind.
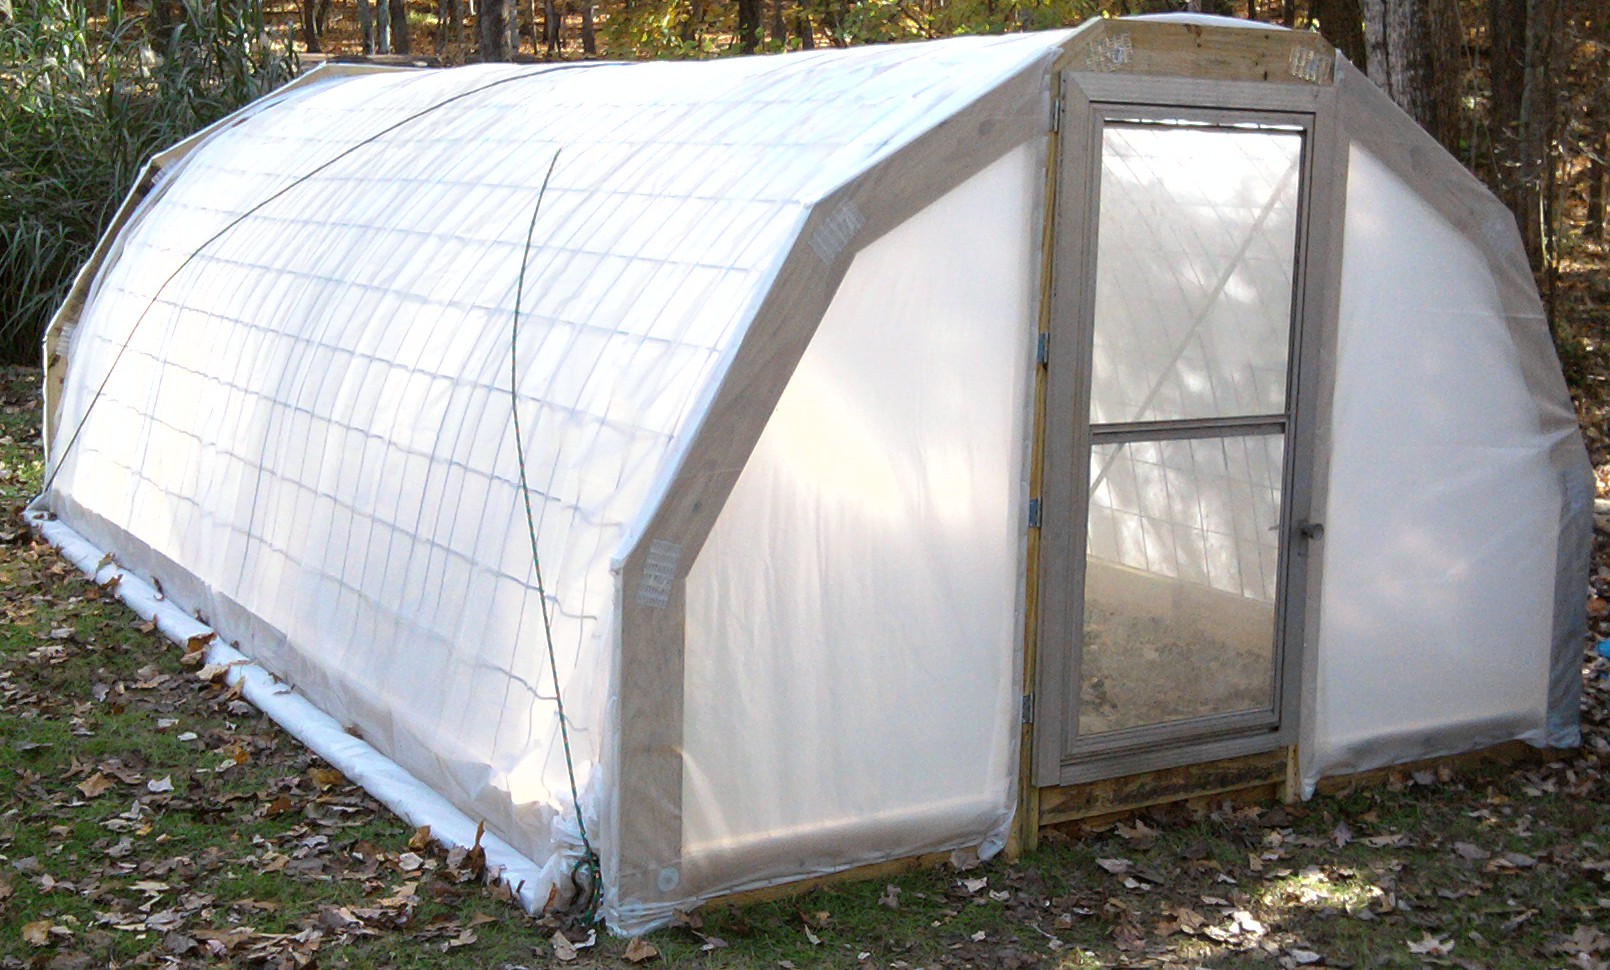
Plastic sheeting is stapled to the end frames of the greenhouse to complete the installation.
In just 15 minutes after closing the plastic, the temperature inside rose several degrees, this with only a little sunlight hitting the greenhouse through fall leaves.
In winter, the center of the greenhouse can be reinforced with a 2×4, propped between the roof and the ground, in case of heavy snow.
A rocket mass heater has been installed in the greenhouse. Here are a couple pictures.
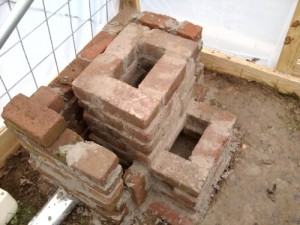
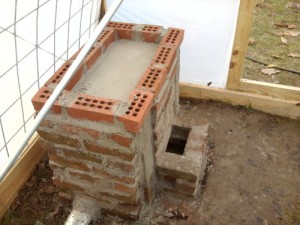
The heater is built of bricks that a friend was giving away. The combustion chamber is the lower opening, and feeds the hot gasses into the vertical stack, as you can see in the work-in-progress photo. There is a sheet of metal under the mortar on the top of the completed unit, and this metal heats fast when the heater is starting up. Gasses from the fire hit this metal and reburn, leaving only CO2 and water vapor as exhaust. The circulation of the gasses around the inner air jacket heats the bricks. The exhaust pipe is at ground level, and runs the length of the greenhouse, covered with dirt to increase the mass and extract more heat. The final exhaust gasses are cool enough to hold your hand over, meaning that this heater is very efficient!
No awards for brick laying here, but the operative word is mass. Fortunately it’s not called a rocket pretty heater.
This greenhouse was built from new materials (except for the door and bricks) for about $350.